Households in conjunction with Business operatives are now attentive towards the concept of Networking. They desire to connect with others in their circle and groups through a standard protocol. At such places, the basic motive behind this approach is usually File Sharing and Transfer. Generally, turning the File Sharing on, provides an equal and free access over the shared information, to rest of the group users. Fortunately, there is a way to put limitations to this access, and unequal distribution of authority over the shared information, among the group users.
The foremost solution which is always encouraged is checking your PC primary healthiness and restoring any discrepancy that perhaps is bringing about the disturbance:
- Step 1 : Download Systimizer – PC Cleaner Tool (Compatible with Windows 10, 8, 7 & XP)
- Step 2 : Click “Scan” to find Windows issues
- Step 3 : Click “Fix” to eliminate all troubles
For an instance, you are one of the users on a network, in an office environment. It is obligatory for you to share a part of your system’s memory with the entire organization, and you cannot argue that. However, obviously, you would have to maintain a difference between the sharing level with the peers of your own department and rest of the organization. This difference is set through sharing permissions.
Stated below is an organized route to grant permission to your collaborators on network.
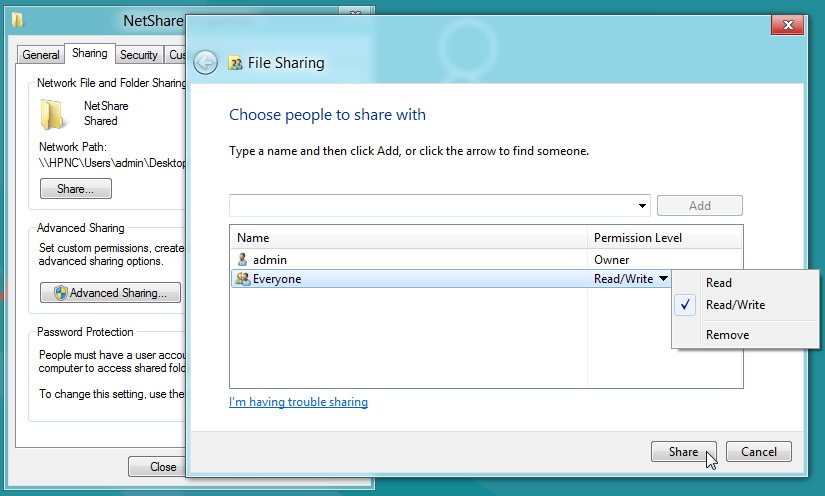
Enable File Sharing
- Open Windows Explorer, and browse to the directory or folder that needs to be shared with others on the network.
- Right click that folder to drop down the context menu, and choose to access Properties, opening the Properties dialog box.
- Go to the Sharing tab, and click the Share button. System would require you to enter the name of user or group, to share this folder with. Click the Share button to save and close.
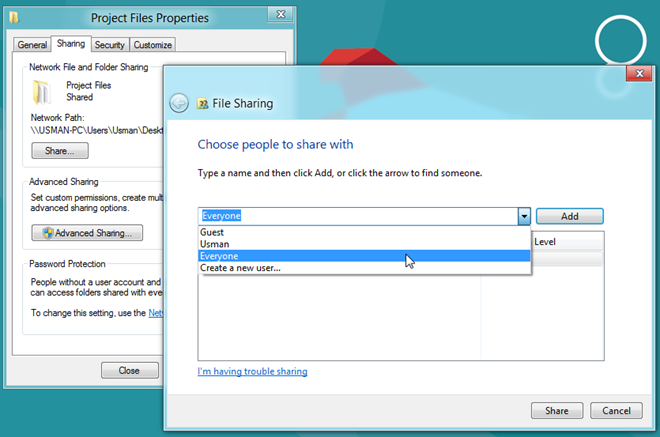
Add/Remove Users/groups to Share with
- Right click the desired folder to view its Context menu, and access its Properties. Go to the Sharing tab, and then click Advance Sharing button, to open up Advanced Sharing dialog box.
- Groups or user names section shows the people, with whom you are sharing this folder. You can remove the existing by clicking the Remove button underneath. Click the Add button to include more users or groups to the sharing circle.
Grant Permission
- Right click the desired folder to view its Context menu, and access its Properties. Go to the Sharing tab, and then click Advance Sharing button, to open up Advanced Sharing dialog box. Click the Permissions button on this dialog box.
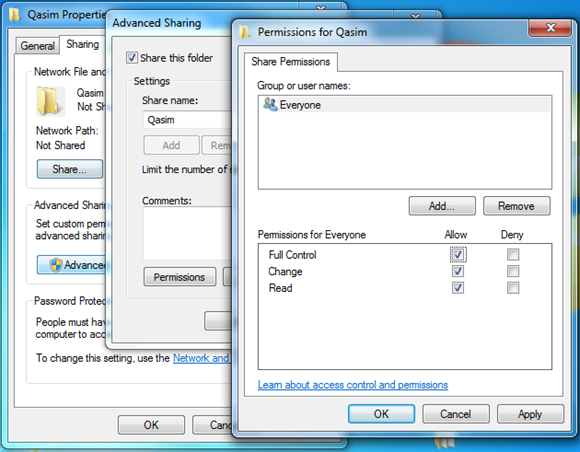
- Read is the least level of permissions. At such a state, other users can only view and copy the content of shared folder, and cannot make changes to it. To set this, check the box next to Read, and under Allow.
- Change is the elevated level of permissions. At such a state, other users can view and copy the content of shared folder, as well as make changes to it. To set this one, check the box next to Change, and under Allow.
- Full Control is the most level of permissions. At such a state, other users have a full control over the content of a shared folder. To set this, check the box next to Full Control, and under Allow.
Carefully applying the steps would help you share files and folders easily on your Windows 8.